Wacom Interactive

Wacom Interactive Pen Display / Cintiq 17"
Product Details

The DTF-720 combines a high quality LCD display with Wacom's patented, cordless, battery-free pen technology. This 17" interactive pen display is an excellent option for applications that can realize the benefits of working with pen on screen.

With a 13.3" x 10.65" display area (141 square inches) and an SXGA resolution of 1280 x 1024, the DTF-720 provides a quality display experience, while at the same time catering to applications that don't require the superior resolution, display quality, and advanced features of the DTZ-2100. The incline of the display can be easily adjusted between 17 degrees and 73 degrees. This easy adjustability, combined with the integrated grip areas, the built-in top-loading pen holder, and a completely flat bezel make the DTF-720 extremely comfortable to use.

The DTF-720 has a built-in VGA pass-thru connector that makes it easy to setup for interactive presentations or take with you when presenting. Annotating on screen with pen control is a naturally powerful way to communicate. Two USB ports built into the display provide easy access to your favorite USB devices.

Product Specifications

Tablet Dimensions: 15.75" W x 14.25" H x 5" D
Active Area: 13.3" W x 10.65" H
Screen Size: 17" diagonal
Native Resolution: SXGA (1280 x 1024)
Weight: 13.2 lbs with stand
Pressure Levels: 512
Stand Adjustability: 17° to 73° incline

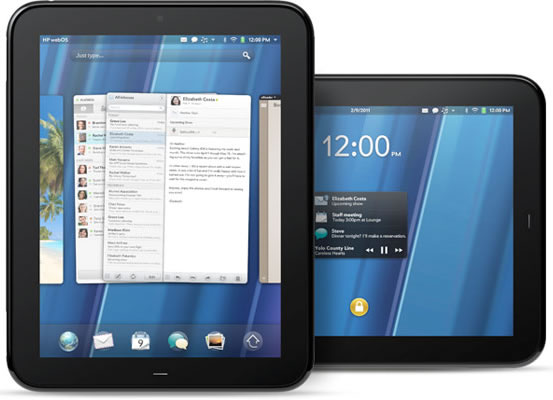
HP (Hewlett-Packard)

HP: "we're going to become better than number one" in tablets

Hewlett-Packard, the world's largest PC manufacturer, plans to do just as well in the tablet market as it is doing in the overall PC market. In fact, the company plans to do even better.

"In the PC world, with fewer ways of differentiating HP's products from our competitors, we became number one; in the tablet world we’re going to become better than number one," HP's European head Eric Cador said at a press conference in Cannes, according to The Telegraph. "We call it number one plus."

HP is likely talking long-term as its current tablet offerings are next to none. Its upcoming webOS tablet looks solid (more information below), but it's nowhere near enough for the company to take gold, or even place in the top three.

HP completed its acquisition of Palm for $1.2 billion in July 2010. Despite suspicions by many that the company would kill webOS, so far it has done the exact opposite. In October 2010, HP officially introduced webOS 2.0, the most significant update to the platform since its launch in 2009, along with the Palm Pre 2, the first device to sport it.

Two months ago, HP announced that it plans to put webOS on all of its PCs in 2012. A beta (running in a browser on Windows) is slated for this year.

HP's webOS strategy appears to be centered on leveraging its PC business to push webOS in mobile: both on smartphones and especially on tablets. It is way too soon to tell if this will work, but if webOS is going to succeed, another mobile OS will likely end up dying a slow death.


The HP TouchPad is a 9.7-inch slate (1024 x 768 resolution), powered by a dual-core 1.2GHz Qualcomm Snapdragon APQ8060 processor, 16GB or 32GB of built-in storage, 1GB of RAM, HP's Beats audio, a micro-USB 2.0 port, Bluetooth 2.1+EDR, a front-mounted 1.3MP camera, as well as a light sensor, gyroscope, accelerometer, compass, and GPS (3G model only). It measures 242 x 190 x 13.7mm and weighs around 740g. The device is running a WebOS 3.0 with true multitasking, Flash 10.1, a paneled e-mail application, a pop-up notification system like Growl, Skype support, wireless printing, calendar and e-mail integration via HP Synergy, as well as compatibility with Amazon's Kindle ebook store, Google Docs, QuickOffice, and more.

We've known for a while now that the HP TouchPad will arrive in June 2011. That being said, it's still not clear when exactly next month we'll be able to grab one, but we'll probably find out soon enough. Pricing should be $500 for the 16GB model and $600 for the 32GB model.

Shorcut Keys

Keyboard Shorcuts (Microsoft Windows)
  1. CTRL+C (Copy)
  2. CTRL+X (Cut)
  3. CTRL+V (Paste)
  4. CTRL+Z (Undo)
  5. DELETE (Delete)
  6. SHIFT+DELETE (Delete the selected item permanently without placing the item in the Recycle Bin)
  7. CTRL while dragging an item (Copy the selected item)
  8. CTRL+SHIFT while dragging an item (Create a shortcut to the selected item)
  9. F2 key (Rename the selected item)
  10. CTRL+RIGHT ARROW (Move the insertion point to the beginning of the next word)
  11. CTRL+LEFT ARROW (Move the insertion point to the beginning of the previous word)
  12. CTRL+DOWN ARROW (Move the insertion point to the beginning of the next paragraph)
  13. CTRL+UP ARROW (Move the insertion point to the beginning of the previous paragraph)
  14. CTRL+SHIFT with any of the arrow keys (Highlight a block of text)
    SHIFT with any of the arrow keys (Select more than one item in a window or on the desktop, or select text in a document)
  15. CTRL+A (Select all)
  16. F3 key (Search for a file or a folder)
  17. ALT+ENTER (View the properties for the selected item)
  18. ALT+F4 (Close the active item, or quit the active program)
  19. ALT+ENTER (Display the properties of the selected object)
  20. ALT+SPACEBAR (Open the shortcut menu for the active window)
  21. CTRL+F4 (Close the active document in programs that enable you to have multiple documents open simultaneously)
  22. ALT+TAB (Switch between the open items)
  23. ALT+ESC (Cycle through items in the order that they had been opened)
  24. F6 key (Cycle through the screen elements in a window or on the desktop)
  25. F4 key (Display the Address bar list in My Computer or Windows Explorer)
  26. SHIFT+F10 (Display the shortcut menu for the selected item)
  27. ALT+SPACEBAR (Display the System menu for the active window)
  28. CTRL+ESC (Display the Start menu)
  29. ALT+Underlined letter in a menu name (Display the corresponding menu) Underlined letter in a command name on an open menu (Perform the corresponding command)
  30. F10 key (Activate the menu bar in the active program)
  31. RIGHT ARROW (Open the next menu to the right, or open a submenu)
  32. LEFT ARROW (Open the next menu to the left, or close a submenu)
  33. F5 key (Update the active window)
  34. BACKSPACE (View the folder one level up in My Computer or Windows Explorer)
  35. ESC (Cancel the current task)
  36. SHIFT when you insert a CD-ROM into the CD-ROM drive (Prevent the CD-ROM from automatically playing)
Dialog Box Keyboard Shortcuts
  1. CTRL+TAB (Move forward through the tabs)
  2. CTRL+SHIFT+TAB (Move backward through the tabs)
  3. TAB (Move forward through the options)
  4. SHIFT+TAB (Move backward through the options)
  5. ALT+Underlined letter (Perform the corresponding command or select the corresponding option)
  6. ENTER (Perform the command for the active option or button)
  7. SPACEBAR (Select or clear the check box if the active option is a check box)
  8. Arrow keys (Select a button if the active option is a group of option buttons)
  9. F1 key (Display Help)
  10. F4 key (Display the items in the active list)
  11. BACKSPACE (Open a folder one level up if a folder is selected in the Save As or Open dialog box)
Microsoft Natural Keyboard Shortcuts
  1. Windows Logo (Display or hide the Start menu)
  2. Windows Logo+BREAK (Display the System Properties dialog box)
  3. Windows Logo+D (Display the desktop)
  4. Windows Logo+M (Minimize all of the windows)
  5. Windows Logo+SHIFT+M (Restore the minimized windows)
  6. Windows Logo+E (Open My Computer)
  7. Windows Logo+F (Search for a file or a folder)
  8. CTRL+Windows Logo+F (Search for computers)
  9. Windows Logo+F1 (Display Windows Help)
  10. Windows Logo+ L (Lock the keyboard)
  11. Windows Logo+R (Open the Run dialog box)
  12. Windows Logo+U (Open Utility Manager)
  13. Accessibility Keyboard Shortcuts
  14. Right SHIFT for eight seconds (Switch FilterKeys either on or off)
  15. Left ALT+left SHIFT+PRINT SCREEN (Switch High Contrast either on or off)
  16. Left ALT+left SHIFT+NUM LOCK (Switch the MouseKeys either on or off)
  17. SHIFT five times (Switch the StickyKeys either on or off)
  18. NUM LOCK for five seconds (Switch the ToggleKeys either on or off)
  19. Windows Logo +U (Open Utility Manager)
  20. Windows Explorer Keyboard Shortcuts
  21. END (Display the bottom of the active window)
  22. HOME (Display the top of the active window)
  23. NUM LOCK+Asterisk sign (*) (Display all of the subfolders that are under the selected folder)
  24. NUM LOCK+Plus sign (+) (Display the contents of the selected folder)
  25. NUM LOCK+Minus sign (-) (Collapse the selected folder)
  26. LEFT ARROW (Collapse the current selection if it is expanded, or select the parent folder)
  27. RIGHT ARROW (Display the current selection if it is collapsed, or select the first subfolder)
Shortcut Keys for Character Map
After you double-click a character on the grid of characters, you can move through the grid by using the keyboard shortcuts:
  1. RIGHT ARROW (Move to the right or to the beginning of the next line)
  2. LEFT ARROW (Move to the left or to the end of the previous line)
  3. UP ARROW (Move up one row)
  4. DOWN ARROW (Move down one row)
  5. PAGE UP (Move up one screen at a time)
  6. PAGE DOWN (Move down one screen at a time)
  7. HOME (Move to the beginning of the line)
  8. END (Move to the end of the line)
  9. CTRL+HOME (Move to the first character)
  10. CTRL+END (Move to the last character)
  11. SPACEBAR (Switch between Enlarged and Normal mode when a character is selected)
Microsoft Management Console (MMC)
Main Window Keyboard Shortcuts
  1. CTRL+O (Open a saved console)
  2. CTRL+N (Open a new console)
  3. CTRL+S (Save the open console)
  4. CTRL+M (Add or remove a console item)
  5. CTRL+W (Open a new window)
  6. F5 key (Update the content of all console windows)
  7. ALT+SPACEBAR (Display the MMC window menu)
  8. ALT+F4 (Close the console)
  9. ALT+A (Display the Action menu)
  10. ALT+V (Display the View menu)
  11. ALT+F (Display the File menu)
  12. ALT+O (Display the Favorites menu)
MMC Console Window Keyboard Shortcuts
  1. CTRL+P (Print the current page or active pane)
  2. ALT+Minus sign (-) (Display the window menu for the active console window)
  3. SHIFT+F10 (Display the Action shortcut menu for the selected item)
  4. F1 key (Open the Help topic, if any, for the selected item)
  5. F5 key (Update the content of all console windows)
  6. CTRL+F10 (Maximize the active console window)
  7. CTRL+F5 (Restore the active console window)
  8. ALT+ENTER (Display the Properties dialog box, if any, for the selected item)
  9. F2 key (Rename the selected item)
  10. CTRL+F4 (Close the active console window. When a console has only one console window, this shortcut closes the console)
Remote Desktop Connection Navigation
  1. CTRL+ALT+END (Open the Microsoft Windows NT Security dialog box)
  2. ALT+PAGE UP (Switch between programs from left to right)
  3. ALT+PAGE DOWN (Switch between programs from right to left)
  4. ALT+INSERT (Cycle through the programs in most recently used order)
  5. ALT+HOME (Display the Start menu)
  6. CTRL+ALT+BREAK (Switch the client computer between a window and a full screen)
  7. ALT+DELETE (Display the Windows menu)
  8. CTRL+ALT+Minus sign (-) (Place a snapshot of the active window in the client on the Terminal server clipboard and provide the same functionality as pressing PRINT SCREEN on a local computer.)
  9. CTRL+ALT+Plus sign (+) (Place a snapshot of the entire client window area on the Terminal server clipboard and provide the same functionality as pressing ALT+PRINT SCREEN on a local computer.)
Microsoft Internet Explorer Navigation
  1. CTRL+B (Open the Organize Favorites dialog box)
  2. CTRL+E (Open the Search bar)
  3. CTRL+F (Start the Find utility)
  4. CTRL+H (Open the History bar)
  5. CTRL+I (Open the Favorites bar)
  6. CTRL+L (Open the Open dialog box)
  7. CTRL+N (Start another instance of the browser with the same Web address)
  8. CTRL+O (Open the Open dialog box, the same as CTRL+L)
  9. CTRL+P (Open the Print dialog box)
  10. CTRL+R (Update the current Web page)
  11. CTRL+W (Close the current window)

Spell Check and Printing

Using Spell Check

The Spell Check tool allows you to check your entire presentation for spelling errors. PowerPoint has a dictionary that you can customize with words typically not included in a standard dictionary.
To Use the Spell Check Tool:
  • Click on Tools  Spelling.
Click on Tools, choose Spelling
OR
  • Click the Spelling button on the Standard Toolbar.
Spelling button 

Scanning for Errors

Once you launch the Spell Check tool, a couple of scenarios can occur:
  • PowerPoint quickly scans your presentation, searching for words that aren't in its dictionary. If there are no recognizable errors, a dialog box will appear stating that the spelling check is complete.
Spelling Check Complete dialog box
  • If there are possible spelling errors, the Spelling dialog box opens and offers you a number of options. Any unrecognized word appears in the Not in Dictionary box.

Spell Check Options

Spelling dialog box with Change selected

You can choose from one of the options in the Spelling dialog box:
  • Ignore - the word is correct and does not need to be added to the custom dictionary.
  • Ignore All - ignore all occurrences of the word.
  • Change - correct the word.
  • Change All - change all occurrences of the spelling of a word.
  • Add - add a word to the custom dictionary.
  • Suggest - PowerPoint suggests possible correct spellings of a word. Scroll through the list to find the correct spelling. Select the appropriate one and click the Change button.
  • AutoCorrect - automatically corrects many common spelling, typing, and grammatical errors.
Once the entire presentation has been checked for spelling errors, and you have made your corrections or changes, click Close.
 The Spell Check tool does not catch all errors. Be sure to read through your text carefully to find any typographical errors.

Previewing and Printing

Once you've corrected any errors in your document, it's time to print. PowerPoint 2003 allows you to preview your presentation before you print. You can preview and print slides, handouts, notes pages and outlines.
To Preview and Print a Presentation:
  • Click on File  Print Preview.
Click on File, choose Print Preview
OR
  • Click the Print Preview button on the Standard Toolbar.
Print Preview button
  • On the Print Preview Toolbar, click the down-pointing arrow next to the Print What box.
Print What box
  • Select the layout that you want to preview and/or print.
  • Click the Close button to return to the presentation or choose Print to print the layout.

Printing a Slide Presentation

If you don't want to preview your presentation in the various formats, you can simply print it.
To Print a Presentation:
  • Click on File  Print.
Click on File, choose Print
  • The Print dialog box opens.
Print dialog Box
  • Click the down-pointing arrow next to the Print What box.
  • Choose Slides, Notes, Handouts, or Outline.
  • Select the print range and number of copies.
  • Click OK.

Animating Slides

Animating Slides

Animating slides involves adding movement and sometimes sound to text or to the slides in a presentation. Animation can help create a livelier and more interesting slide show. PowerPoint provides some preset animation or allows you to customize the animation to fit your needs.
To Animate Slides using Animation Schemes:
  • Open the PowerPoint presentation that you want to work on.
  • Select the slide that you want to animate.
  • In the Task Pane, click the down-pointing arrow and select Slide Design - Animation Schemes.
Choose Slide Design, Animation Schemes 

Choosing Animation for Your Slides

PowerPoint offers several options for animating your slides.
  • Once you click on Slide  Design Animation Schemes, the Slide Design pane appears with a list of options.
Slide Design pane
  • Click on an Animation Scheme that you think might work well in your presentation. (To preview your choice, make sure that the AutoPreview option is checked).
  • Preview different schemes to see which one best fits your slides.
  • You can apply different animation to each individual slide or click on APPLY TO ALL SLIDES.
  • Once you have applied your animation you can click on Play or Slide Show to view it.
  • Remove animation by selecting No Animation in the white box.

Adding Custom Animation

You can also decide how text and other slide elements 'perform' by using custom animation. You can add effect, set speed and direction, and animate text on your own.
For example, you can decide how words or graphics enter or exit a slide. You may want to begin by adding effect to the titles in your presentation.
To Add Effect to Text:
  • Open the presentation you want to add an effect to.
  • Click on the down-pointing arrow in the Task Pane  Custom Animation.
Choose Custom Animation
  • Click the text that you want to add an effect to.
  • The Add Effect button will be activated. (Note the button is inactive until you select a part of the slide to work on)
Add Effect button activated
  • Click on Add Effect  Entrance.
  • A list of options appears for the entrance including Blinds, Box, Checkboard, and Fly In.
  • Decide how your text will appear on the screen and choose an option.
  • You can easily remove the effect by clicking Remove. Or, you can modify it by setting direction and speed underneath Modify. (PowerPoint lets you know the specific effect by listing it next to Modify. For example, Modify: Blinds).

Emphasis and Exit

If you want to add an effect to make text or graphics grow, shrink, or change in another way, click on Add Effect  Emphasis. Choose an effect. If you want to add an effect to have text or graphics exit the slide, click on Add Effect  Exit. Choose the effect.

Setting Direction and Speed

Once you choose an effect, decide the direction for that effect. For example, you may want text to Fly In from the bottom. (Make sure your animation doesn't cross important graphics or text in your presentation).
To Set Direction:
  • Underneath Modify in the Custom Animation pane, click on the down pointing arrow beneath Direction. (Note that direction options vary depending on the type of effect).
List of direction options for animating content
  • Choose the side of the slide from which you want the title to enter.
  • Underneath Modify next to Start, select With Previous (Animation starts automatically) or On Click (Animation starts when you click the mouse).
Decide the speed at which you want effects to happen in your slides. You can choose very slow, slow, medium, fast or very fast to fit the rhythm of your presentation.
To Set Speed:
  • Click on the down-pointing arrow underneath Speed and choose an option
Choosing very fast as speed of effects


Animating a Bulleted List

A bulleted list may be another area that you might want to animate.
To Add Animation to a Bulleted List:
  • Open the slide with the bulleted list you want to animate.
  • Click on the text box that contains the text you want to animate.
  • Click on the down-pointing arrow in the Task Pane Custom Animation.
Choose Custom Animation
  • The Add Effect button is now active.

Controlling Your Text

With the Add Effect button active, you can control the text in your bulleted list:
To Set Animation in a Bulleted List:
  • Select the line of text you want to animate.
  • Once a line is selected, the Add Effect button becomes active.
  • Select whether you would like to add Entrance, Emphasis, Exit, and/or Motion Paths.
  • Using the downward pointing arrow to the right of each category:
    • Decide if you want this animation to occur On the Click, With Previous, or After Previous.
    • Select the Direction the animation will occur (direction options will differ depending on the animation.
    • Choose a Speed for the animation.
  • To make changes to an animation, simply locate the number of the animation you wish to change and use the downward pointing arrow to the right of that numbered animation.
  • To set the direction/timing, you can select Effect Options from the menu.
  • List of effect options
    • A dialog box appears.
    • Click on the Text Animation tab.
    Dialog box with text animation tab selected
    • The default option is By 1st level paragraphs. This is the level for the main bullet points. Bullets points will enter one at a time on the slide
    • If you want the bullet points to enter as a group, choose As one object.

     If you have multiple levels of bullets in a slide and you want to animate all levels, choose by 2nd level paragraphs if you have 2nd level bullets, and choose by 3rd level paragraphs if you have three levels of bullets etc.